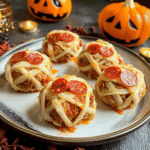
How to Make Halloween Mummy Meatballs Fast

Looking for a quick and delightful way to add some spooky fun to your party? Halloween Mummy Meatballs are the perfect treat to wow your guests with minimal effort. These adorable, easy-to-make snacks combine juicy meatballs wrapped in cheesy “mummy bandages,” creating a festive and flavorful bite everyone will adore. Whether you’re hosting a Halloween bash or preparing a playful family meal, this quick and easy Halloween Mummy Meatballs recipe delivers both taste and charm in one irresistible package.
Why You’ll Love This Recipe
- Super Quick to Make: Ready in under 30 minutes, making them perfect for last-minute parties or snacks.
- Kid-Friendly Fun: The playful mummy design delights children and encourages picky eaters to try new flavors.
- Easy Ingredients: Uses simple pantry staples that are easy to find and budget-friendly.
- Customizable: Easily adapted to suit dietary preferences or spice levels for your perfect spooky snack.
- Great for Entertaining: Perfect bite-sized portions that guests can grab and enjoy without utensils.
Ingredients You’ll Need
Gathering the right ingredients for Halloween Mummy Meatballs is easier than you think. Each component plays an important role — from juicy meatballs that carry rich flavor to the cheesy “bandages” that bring the whole spooky look together. These essentials ensure your snack tastes just as amazing as it looks.
- Ground Meat: Choose ground beef, turkey, or chicken for juicy and tender meatballs.
- Breadcrumbs: Helps bind the meat mixture and adds a light texture.
- Egg: Acts as a natural glue to hold the meatballs together firmly.
- Onion and Garlic: Fresh minced onion and garlic provide depth and savory aroma.
- Cheese Slices or String Cheese: Creates the signature “mummy bandages” with a melty, delicious finish.
- Ketchup or BBQ Sauce: Adds moistness and a touch of tangy sweetness.
- Black Olives or Peppercorns: Perfect for crafting the mummy’s cute little eyes.
- Seasonings: Salt, pepper, and your favorite herbs like parsley or oregano for balanced flavor.
Variations for Halloween Mummy Meatballs
Customization is the name of the game with this recipe. Whether you want to swap ingredients for dietary reasons or ramp up the flavor, Halloween Mummy Meatballs provide a flexible foundation. Experiment with these fun variations to make the recipe your own.
- Vegetarian Version: Use plant-based meat alternatives or mashed chickpeas with spices instead of ground meat.
- Spicy Mummies: Add chili flakes or hot sauce into the meat mixture for a fiery kick.
- Cheese Options: Swap mozzarella string cheese with cheddar or pepper jack for different textures and tastes.
- Gluten-Free: Replace regular breadcrumbs with gluten-free alternatives or crushed nuts.
- Mini Meatballs: Make smaller bite-sized mummies perfect for kids or a casual snack table.

How to Make Halloween Mummy Meatballs
Step 1: Prepare the Meatball Mixture
In a large bowl, combine ground meat, breadcrumbs, egg, minced onion, garlic, salt, pepper, and your chosen herbs. Mix everything gently but thoroughly, ensuring all flavors are evenly incorporated.
Step 2: Shape the Meatballs
Roll the mixture into small, even-sized balls—about 1 to 1.5 inches in diameter—to ensure they cook evenly and are perfectly bite-sized.
Step 3: Cook the Meatballs
Place the meatballs on a baking sheet lined with parchment paper, and bake in a preheated oven at 375°F (190°C) for 15-20 minutes or until cooked through and browned on the outside.
Step 4: Add the Mummy Bandages
Slice cheese into thin strips and carefully wrap them around each warm meatball to resemble mummy bandages, leaving small gaps to create that signature spooky look.
Step 5: Add Eyes and Bake Again
Using black olive slices or peppercorns, create two eyes on each meatball. Pop the meatballs back into the oven for 3-5 minutes to melt the cheese slightly and set the eyes in place.
Step 6: Serve and Enjoy
Remove from the oven and transfer the Halloween Mummy Meatballs to a serving platter. Optionally, drizzle with ketchup or your favorite dipping sauce for extra flavor.
Pro Tips for Making Halloween Mummy Meatballs
- Choose Uniform Sizes: Keeping meatballs the same size ensures even cooking and a great presentation.
- Don’t Overmix: Mix ingredients until just combined to avoid dense, tough meatballs.
- Cheese Wrapping: Use room-temperature cheese strips for easier wrapping around the hot meatballs.
- Use Toothpicks: Insert toothpicks carefully to hold eyes or bandages if needed, but remove them before serving.
- Keep Warm: Place cooked meatballs in a warm oven if not serving immediately to maintain juiciness.
How to Serve Halloween Mummy Meatballs
Garnishes
Sprinkle freshly chopped parsley or a dash of smoked paprika around the platter to add color and a subtle aroma that complements the savory flavors of the meatballs.
Side Dishes
Pair these spooky treats with classic Halloween sides like roasted pumpkin slices, buttery mashed potatoes, or a crisp green salad to balance the richness of the meatballs.
Creative Ways to Present
Serve Halloween Mummy Meatballs in mini cauldrons, on rustic wooden boards, or alongside themed decorations like spiderweb napkins and carved pumpkins to enhance the festive vibe at your party.
Make Ahead and Storage
Storing Leftovers
Place leftover Halloween Mummy Meatballs in an airtight container and refrigerate for up to 3 days, ensuring they remain fresh and ready to reheat.
Freezing
Flash-freeze meatballs on a baking sheet for an hour, then transfer them to a freezer-safe bag or container. They’ll keep up to 2 months frozen without losing flavor or texture.
Reheating
Reheat refrigerated or frozen meatballs in a preheated oven at 350°F (175°C) for 10-15 minutes until warmed through, or microwave on medium power in short bursts to avoid drying out.
FAQs
Can I make Halloween Mummy Meatballs vegetarian?
Absolutely! Use plant-based ground meat substitutes or a mixture of mashed beans, breadcrumbs, and seasonings to create tasty vegetarian mummies.
What cheese works best for the mummy wraps?
String cheese or sliced mozzarella is ideal because it melts easily and can be sliced into thin strips to look like bandages.
Can these be made gluten-free?
Yes, simply swap regular breadcrumbs for gluten-free breadcrumbs or crushed nuts to keep the texture light and delicious.
How long can I store leftover meatballs?
Store leftovers in the refrigerator for up to three days in an airtight container to maintain freshness and flavor.
Do I need a special sauce to serve with these meatballs?
No special sauce is necessary, but classic ketchup, BBQ sauce, or a spicy marinara makes excellent dipping options that enhance the fun.
Final Thoughts
Halloween Mummy Meatballs are a fantastic way to bring fun and flavor together in a snap. Whether for a festive party or a creative family dinner, this quick and easy recipe guarantees smiles and full bellies. Give it a try and watch these spooky snacks disappear before your eyes!
Related Posts
- How to Make Peanut Butter Energy Balls Fast
- Easy Asian Chicken Lettuce Wraps Recipe
- Why Parmesan Cauliflower Bites Are Perfect Snacks
Halloween Mummy Meatballs
Halloween Mummy Meatballs are a quick, fun, and festive appetizer combining juicy baked meatballs wrapped in melty cheesy ‘mummy bandages’ with cute olive eyes. Perfect for last-minute parties or family meals, these bite-sized snacks are easy to make, customizable, and sure to delight guests of all ages.
- Prep Time: 10 minutes
- Cook Time: 20 minutes
- Total Time: 30 minutes
- Yield: 24 meatballs 1x
- Category: Appetizers
- Method: Baking
- Cuisine: American
- Diet: Gluten Free
Ingredients
Meatball Mixture
- 1 lb ground meat (beef, turkey, or chicken)
- 1/2 cup breadcrumbs (regular or gluten-free)
- 1 large egg
- 1/4 cup minced onion
- 2 cloves garlic, minced
- 1/2 tsp salt
- 1/4 tsp black pepper
- 1 tbsp chopped fresh herbs (parsley or oregano)
Mummy Bandages and Decoration
- 4–6 slices cheese (mozzarella string cheese or sliced mozzarella, cheddar, or pepper jack), sliced into thin strips
- Ketchup or BBQ sauce (for serving, optional)
- Black olives or whole peppercorns (for eyes)
Instructions
- Prepare the Meatball Mixture: In a large bowl, combine ground meat, breadcrumbs, egg, minced onion, garlic, salt, pepper, and chosen herbs. Mix gently but thoroughly to evenly incorporate all ingredients.
- Shape the Meatballs: Roll the mixture into small, even-sized balls about 1 to 1.5 inches in diameter to ensure even cooking and easy bite-sized portions.
- Cook the Meatballs: Place meatballs on a parchment-lined baking sheet and bake at 375°F (190°C) for 15-20 minutes until cooked through and browned on the outside.
- Add the Mummy Bandages: Slice cheese into thin strips and carefully wrap them around each warm meatball, leaving small gaps to create the mummy effect.
- Add Eyes and Bake Again: Place two small black olive slices or peppercorns on each meatball to form eyes. Return the meatballs to the oven for 3-5 minutes to slightly melt the cheese and set the eyes.
- Serve and Enjoy: Remove from oven and transfer to a serving platter. Optionally, drizzle with ketchup or your favorite dipping sauce for extra flavor.
Notes
- Choose uniform-sized meatballs for even cooking and presentation.
- Do not overmix the meat mixture to keep meatballs tender.
- Use room-temperature cheese strips for easier wrapping around meatballs.
- If needed, use toothpicks to hold bandages or eyes in place but remove before serving.
- Keep cooked meatballs warm in the oven if not serving immediately.
Nutrition
- Serving Size: 3 meatballs
- Calories: 210 kcal
- Sugar: 2 g
- Sodium: 380 mg
- Fat: 14 g
- Saturated Fat: 6 g
- Unsaturated Fat: 6 g
- Trans Fat: 0 g
- Carbohydrates: 10 g
- Fiber: 1 g
- Protein: 14 g
- Cholesterol: 75 mg
Keywords: Halloween, mummy meatballs, spooky snacks, party appetizers, kid-friendly, easy recipes, baking, cheesy meatballs