Best Homemade Garlic Bread Rolls to Try Today
If you’ve ever dreamed of biting into soft, buttery, and garlicky heaven, then these Homemade Garlic Bread Rolls are exactly what you need in your kitchen. This recipe takes simple ingredients and transforms them into delightfully fluffy rolls bursting with rich garlic flavor, perfect for accompanying dinner, serving as a snack, or sharing with friends and family. Whether you’re a seasoned baker or just starting out, these rolls are straightforward to make and will quickly become a staple in your meal rotation.
Why You’ll Love This Recipe
- Soft and fluffy texture: These rolls are tender inside with a light crust, making every bite melt in your mouth.
- Rich garlic flavor: Each roll is infused with just the right amount of garlic to satisfy your cravings without overpowering your palate.
- Simple ingredients: You don’t need fancy or hard-to-find items to whip these rolls up, making this perfect for any home cook.
- Versatile snack or side: Great whether paired with soups, salads, or pasta dishes, or enjoyed on their own as a comforting treat.
- Freshly baked aroma: Nothing beats the smell of warm garlic and butter filling your home, promising a delicious meal ahead.
Ingredients You’ll Need
Gathering these uncomplicated yet essential ingredients is your first step toward making incredible Homemade Garlic Bread Rolls. Each item contributes to the perfect taste, texture, and golden color that sets these rolls apart from ordinary bread.
- All-purpose flour: The foundation of the dough provides structure and fluffiness.
- Active dry yeast: Helps the dough rise to a soft and airy consistency.
- Warm water: Activates the yeast and blends the dough.
- Unsalted butter: Adds richness and creates a tender crumb inside the rolls.
- Garlic cloves: Freshly minced for that unmistakable, bold garlic flavor.
- Fresh parsley: Chopped finely to add a vibrant color and fresh herbal note.
- Salt: Enhances all flavors while balancing the garlic’s intensity.
- Sugar: A touch to feed the yeast and mellow the flavors.
Variations for Homemade Garlic Bread Rolls
This recipe is wonderfully flexible, allowing you to add your personal flair or accommodate dietary preferences with ease. Give these ideas a try and watch your rolls transform to suit any occasion or craving.
- Cheesy garlic rolls: Mix shredded mozzarella or parmesan cheese into the dough or sprinkle on top before baking for an extra indulgent treat.
- Herb-infused rolls: Swap parsley with rosemary, thyme, or oregano for a fragrant twist.
- Whole wheat version: Replace half of the all-purpose flour with whole wheat for a heartier, fiber-rich option.
- Spicy garlic rolls: Add a pinch of red pepper flakes to the garlic butter for a subtle heat kick.
- Vegan garlic rolls: Use olive oil or vegan butter in place of traditional butter and substitute honey with maple syrup if needed.

How to Make Homemade Garlic Bread Rolls
Step 1: Prepare the Dough
Start by activating the yeast in warm water with sugar—let it foam for about 5 minutes. In a large bowl, combine the flour and salt, then pour in the yeast mixture and melted butter. Mix everything together until a soft dough forms.
Step 2: Knead and Rise
Turn the dough onto a floured surface and knead for about 8–10 minutes until smooth and elastic. Place it into a lightly greased bowl, cover with a clean towel, and let it rise in a warm spot until doubled in size, about 1 hour.
Step 3: Shape the Rolls
Once the dough has risen, punch it down and divide it into equal pieces. Shape each piece into a ball and place them on a baking tray lined with parchment paper, allowing some space between each roll.
Step 4: Make the Garlic Butter
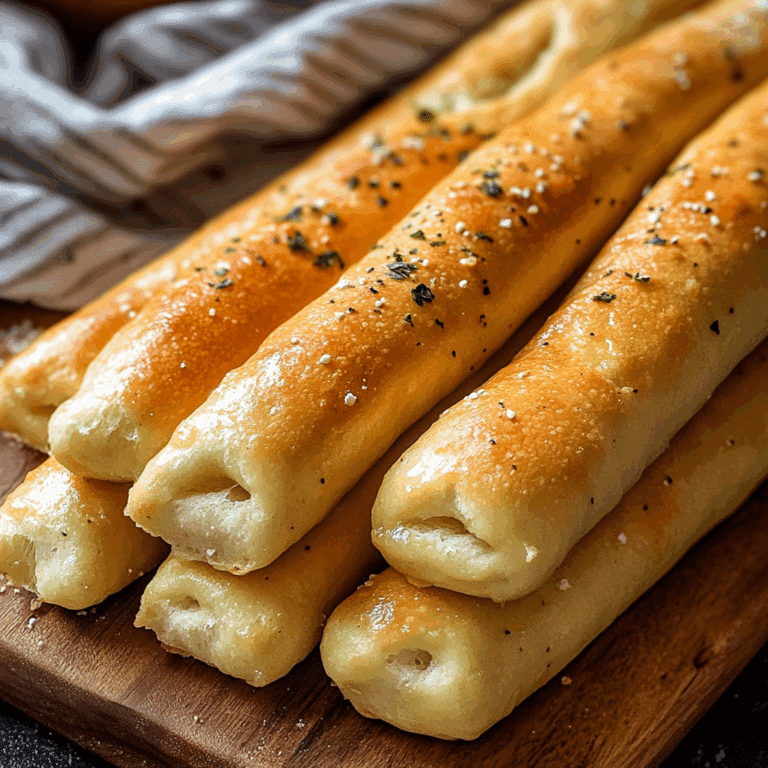
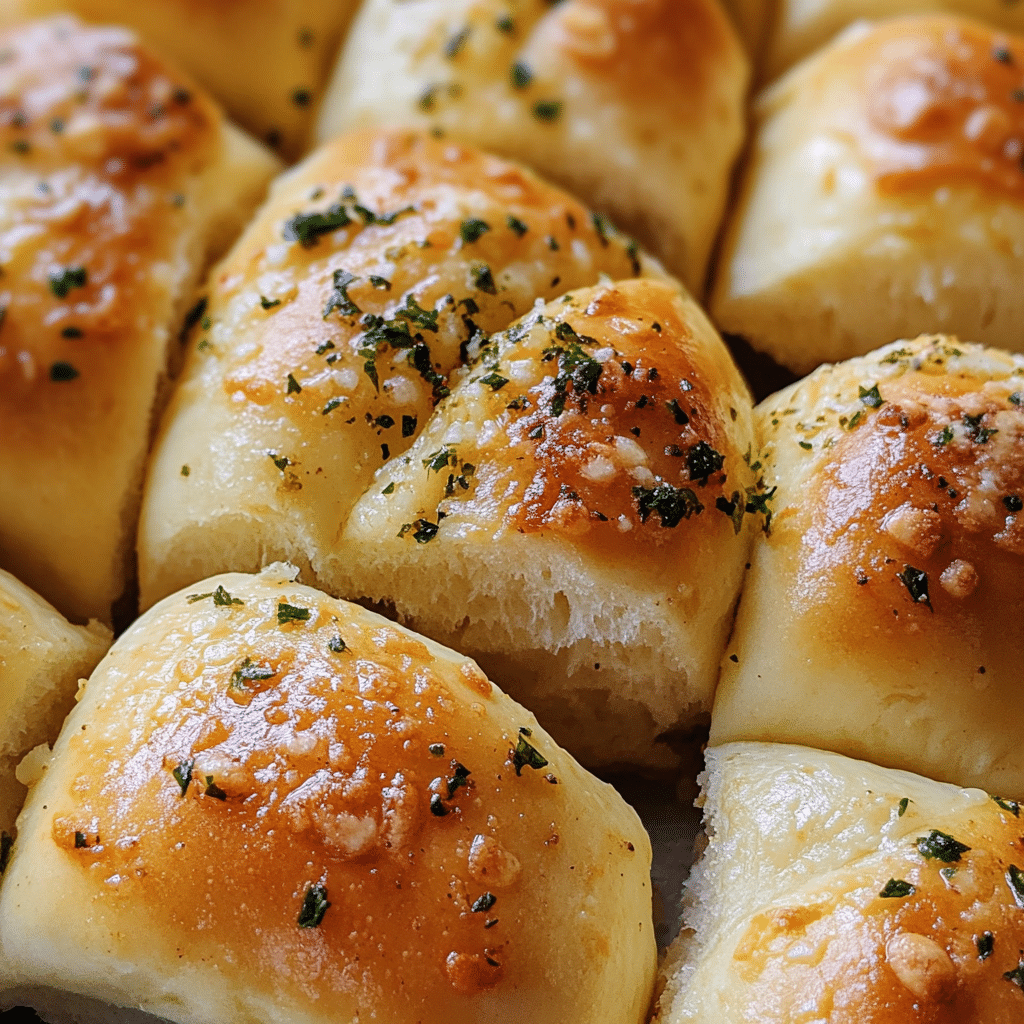
While the rolls rest for a second rise (about 30 minutes), combine softened butter, minced garlic, and chopped parsley. Brush this mixture generously onto each roll before baking.
Step 5: Bake to Golden Perfection
Preheat your oven to 375°F (190°C) and bake the rolls for 15–20 minutes or until golden brown on top. For an extra buttery finish, brush with more garlic butter right after they come out.
Pro Tips for Making Homemade Garlic Bread Rolls
- Use fresh garlic: It makes a world of difference in flavor compared to garlic powder or pre-minced garlic.
- Perfect dough temperature: Ensure water is warm but not hot—around 110°F (43°C) to avoid killing the yeast.
- Don’t skip the second rise: It gives the rolls their fluffy texture and better flavor development.
- Brush generously: Garlic butter should be applied before and after baking for maximum taste and moisture.
- Try a stand mixer: If you have one, use the dough hook attachment to knead quickly and efficiently.
How to Serve Homemade Garlic Bread Rolls
Garnishes
Sprinkle freshly chopped parsley or grated parmesan on top of warm rolls for a pop of color and extra flavor that complements the garlic perfectly.
Side Dishes
Pair these rolls with hearty soups like tomato bisque, creamy pasta dishes, or fresh salads to balance the buttery richness and add texture to your meal.
Creative Ways to Present
Serve the rolls stacked in a basket lined with a rustic linen napkin or spread with flavored butters like herb or sun-dried tomato butter to impress your guests at any gathering.
Make Ahead and Storage
Storing Leftovers
Keep your garlic bread rolls fresh by placing them in an airtight container or a sealed plastic bag at room temperature. They will stay soft for up to 2 days.
Freezing
To preserve for longer, freeze the cooled rolls in a freezer-safe bag. Thaw them overnight in the refrigerator before reheating.
Reheating
Warm leftovers in the oven at 350°F (175°C) for 5–7 minutes to regain their crisp edges and soft interior. For a quick option, microwave for 15–20 seconds, then broil briefly for a little crunch.
FAQs
Can I use garlic powder instead of fresh garlic?
While garlic powder can work in a pinch, fresh garlic delivers a much more vibrant and authentic flavor for these rolls.
How long does the dough need to rise?
The dough should rise until doubled in size, generally about 1 hour, depending on your room temperature and yeast activity.
Can I make these rolls gluten-free?
Yes! Use a gluten-free baking blend designed for yeast breads and adjust liquids slightly, but expect a different texture than traditional rolls.
What’s the best way to get a crispy crust?
Brushing the rolls with garlic butter before and after baking and baking at the right temperature helps develop a perfect crunchy crust.
Can I add cheese inside the rolls?
Absolutely! Adding a small cube of mozzarella or your favorite cheese in the center before shaping creates a delicious, gooey surprise.
Final Thoughts
These Homemade Garlic Bread Rolls are truly a joy to make and eat, offering comforting, buttery, and garlicky goodness in every bite. They bring warmth and flavor to any table and are simple enough to become a regular treat. So roll up your sleeves and treat yourself to these irresistible garlic rolls—you won’t regret it!
Related Posts
- Easy Air-Fryer Pita Snacks You’ll Love
- How to Make Perfect Homemade Breadsticks
- Crispy Zucchini & Sweet Potato Fritters You’ll Love
Homemade Garlic Bread Rolls
These Homemade Garlic Bread Rolls are soft, fluffy, and bursting with rich garlic flavor, perfect as a side or snack. Easy to make with simple ingredients, they deliver buttery, garlicky goodness complemented by fresh parsley, ideal for any meal or gathering.
- Prep Time: 15 minutes
- Cook Time: 15-20 minutes
- Total Time: 2 hours
- Yield: 12 rolls 1x
- Category: Appetizers
- Method: Baking
- Cuisine: American/Italian
- Diet: Gluten Free
Ingredients
Dough Ingredients
- 3 1/2 cups all-purpose flour
- 2 1/4 teaspoons active dry yeast (1 packet)
- 1 1/4 cups warm water (about 110°F / 43°C)
- 2 tablespoons unsalted butter, melted
- 1 teaspoon salt
- 1 teaspoon sugar
Garlic Butter Topping
- 4 tablespoons unsalted butter, softened
- 3 garlic cloves, freshly minced
- 2 tablespoons fresh parsley, finely chopped
Instructions
- Prepare the Dough: Activate the yeast by dissolving it and the sugar in warm water and let it foam for about 5 minutes. In a large bowl, combine flour and salt, then add the yeast mixture and melted butter. Mix until a soft dough forms.
- Knead and Rise: Turn the dough onto a floured surface and knead for 8–10 minutes until smooth and elastic. Place the dough in a lightly greased bowl, cover with a clean towel, and let it rise in a warm spot until doubled in size, about 1 hour.
- Shape the Rolls: Punch down the risen dough and divide into equal pieces. Shape each piece into a ball and place on a parchment-lined baking tray with space between each roll.
- Make the Garlic Butter: While the rolls rest for the second rise (about 30 minutes), mix softened butter, minced garlic, and chopped parsley. Brush this garlic butter generously over each roll.
- Bake to Golden Perfection: Preheat the oven to 375°F (190°C). Bake the rolls for 15–20 minutes or until golden brown on top. For extra flavor, brush additional garlic butter over the rolls immediately after baking.
Notes
- Use fresh garlic for the best and most vibrant flavor.
- Warm water should be around 110°F (43°C) to activate yeast without killing it.
- Do not skip the second rise to ensure fluffy texture and enhanced flavor.
- Brush garlic butter before and after baking for maximum taste and moisture.
- Consider using a stand mixer with a dough hook to knead efficiently.
Nutrition
- Serving Size: 1 roll
- Calories: 150
- Sugar: 2g
- Sodium: 180mg
- Fat: 6g
- Saturated Fat: 3.5g
- Unsaturated Fat: 2g
- Trans Fat: 0g
- Carbohydrates: 20g
- Fiber: 1g
- Protein: 4g
- Cholesterol: 15mg
Keywords: garlic bread rolls, homemade garlic rolls, soft garlic rolls, garlic bread recipe, easy bread rolls