Easy Moo Goo Gai Pan Recipe for Busy Nights
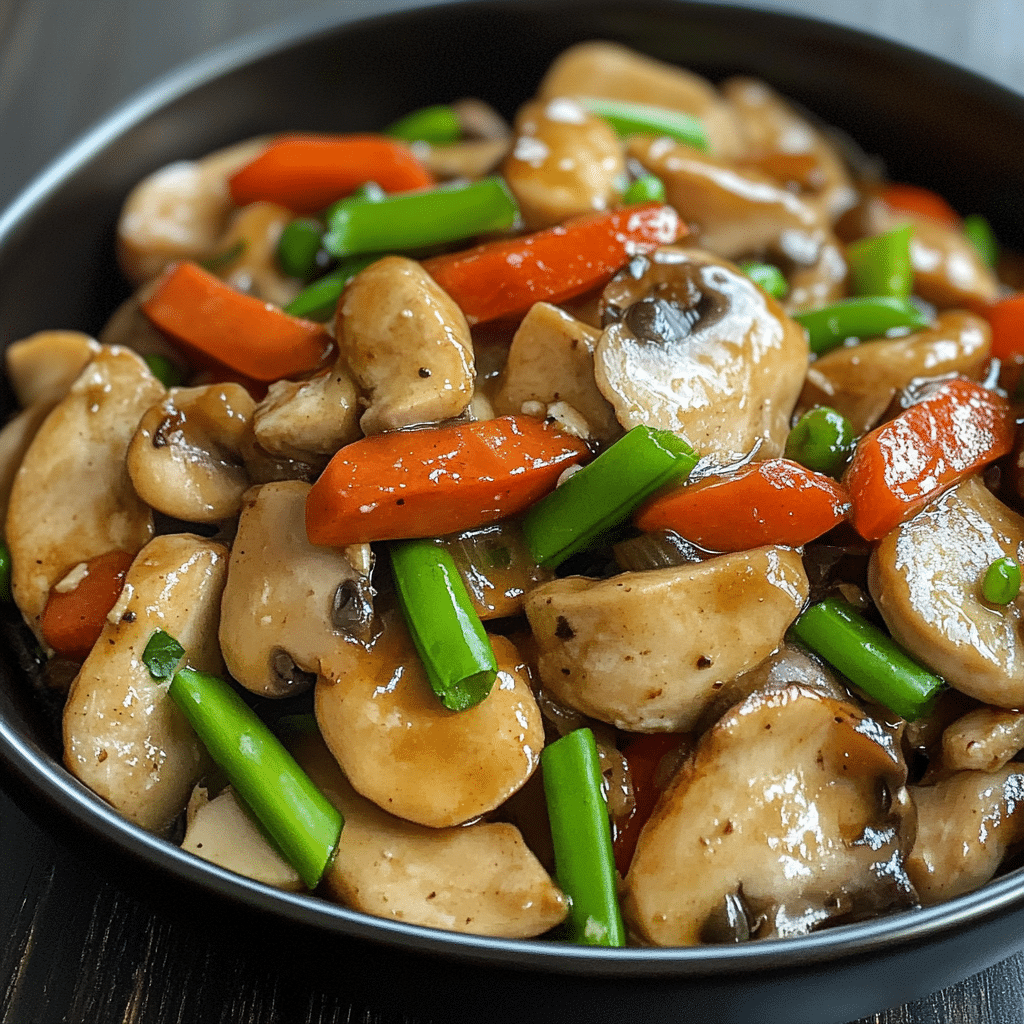
If you’re looking for a quick and wholesome dinner that feels both comforting and fresh, this easy Moo Goo Gai Pan recipe is exactly what you need. Whip up a quick and delicious Moo Goo Gai Pan with this easy recipe, perfect for busy nights when you need a tasty, homemade meal fast. Loaded with tender chicken, crisp vegetables, and a savory sauce, this classic Chinese dish shines as a weeknight favorite that brings vibrant flavors to your table without hours of cooking.
Why You’ll Love This Recipe
- Speedy Preparation: Ready in under 30 minutes, it’s ideal for nights when time is tight but you still crave home-cooked comfort.
- Simple Ingredients: Uses accessible, fresh ingredients that come together for a balanced flavor without complicated shopping.
- Healthy and Light: Packed with vegetables and lean chicken, it’s a nutritious alternative to heavier takeout options.
- Family Friendly: Mild flavors and tender textures make it a hit for kids and adults alike.
- Versatile Dish: Easily customize veggies or protein to suit your preferences or what’s in your fridge.
Ingredients You’ll Need
The ingredients for this Moo Goo Gai Pan are straightforward yet each plays an important role in delivering that authentic taste and delightful texture. From tender chicken to crisp mushrooms and vibrant snap peas, these essentials create a colorful and flavorful dish with minimal fuss.
- Boneless chicken breast: Provides tender, lean protein that cooks quickly and absorbs the sauce beautifully.
- Fresh button mushrooms: Add earthiness and a meaty texture that complements the chicken.
- Snow peas or snap peas: Contribute a sweet crunch and vibrant color to brighten the dish.
- Water chestnuts: Bring a pleasant, crisp bite for textural contrast.
- Garlic and ginger: Infuse fundamental savory and zesty flavors throughout the sauce.
- Chicken broth: Creates a flavorful base and keeps the dish moist without heaviness.
- Soy sauce: Adds well-rounded umami depth and subtle saltiness.
- Oyster sauce: Enhances richness with a hint of sweetness and complexity.
- Cornstarch slurry: Thickens the sauce perfectly to coat each ingredient in silky goodness.
- Sesame oil: A dash at the end offers a fragrant finishing touch that lifts the whole dish.
Variations for Moo Goo Gai Pan
This Moo Goo Gai Pan recipe is wonderfully flexible, making it simple to tailor based on what you have at home, dietary preferences, or the flavors you want to highlight. Feel free to experiment with these ideas to keep this favorite fresh and exciting.
- Swap chicken for tofu: Use firm tofu cubes for a vegetarian or vegan-friendly version.
- Mix different vegetables: Try bell peppers, baby corn, or broccoli for extra color and nutrition.
- Gluten-free adjustment: Use tamari instead of soy sauce and cornstarch as the thickener to keep it gluten-free.
- Add heat: Sprinkle some crushed red pepper flakes or add a dash of chili garlic sauce for a little kick.
- Use different mushrooms: Shiitake or cremini mushrooms add a deeper umami flavor.

How to Make Moo Goo Gai Pan
Step 1: Prepare the Ingredients
Start by slicing the chicken breast into thin, bite-sized pieces so they cook quickly and evenly. Clean and slice the mushrooms, trim the snow peas, and rinse the water chestnuts. Mince the garlic and ginger to release their aromatic oils.
Step 2: Make the Sauce
In a small bowl, whisk together chicken broth, soy sauce, oyster sauce, and a cornstarch slurry. This simple sauce is what turns the stir-fried ingredients into a lovely, glossy, and flavorful dish.
Step 3: Cook the Chicken
Heat a wok or large skillet over medium-high heat with a bit of oil, then add the chicken pieces. Stir-fry until the chicken turns opaque and just begins to brown, then remove it from the pan to prevent overcooking.
Step 4: Stir-Fry the Vegetables
Add garlic, ginger, mushrooms, snow peas, and water chestnuts to the pan. Stir-fry until the veggies are tender-crisp, preserving their color and crunch which add fantastic texture.
Step 5: Combine and Simmer
Return the cooked chicken to the pan, pour in the sauce, and stir well. Let everything simmer for a couple of minutes, allowing the sauce to thicken and coat the ingredients.
Step 6: Finish with Sesame Oil
Turn off the heat and drizzle in a touch of sesame oil. Give everything a final toss to distribute the nutty fragrance throughout the dish before serving.
Pro Tips for Making Moo Goo Gai Pan
- Prep all ingredients first: Stir-frying is a fast process; having everything ready prevents overcooking.
- Use high heat: Cooking over high heat keeps vegetables crisp and chicken tender.
- Don’t overcrowd your pan: Stir-fry in batches if needed to maintain even cooking and avoid steaming.
- Cut chicken uniformly: Thin, even pieces cook consistently, ensuring juiciness.
- Add sauce gradually: Pour half first and adjust thickness as needed with cornstarch slurry.
How to Serve Moo Goo Gai Pan
Garnishes
Fresh chopped scallions or a sprinkle of toasted sesame seeds add a pop of color and mild crunch that complement the flavors perfectly.
Side Dishes
This dish pairs wonderfully with fluffy steamed white or jasmine rice which soaks up the savory sauce. For a low-carb option, serve alongside cauliflower rice or steamed greens.
Creative Ways to Present
Try serving Moo Goo Gai Pan in lettuce cups for a light, hand-held meal or pile it over a bed of noodles for a comforting twist that’s ready in minutes.
Make Ahead and Storage
Storing Leftovers
Place cooled Moo Goo Gai Pan in an airtight container and refrigerate. It will stay fresh for up to 3 days, making it great for quick lunches or dinners later in the week.
Freezing
While you can freeze Moo Goo Gai Pan, keep in mind that some vegetables may become softer after thawing. Use freezer-safe containers and consume within 2 months for best quality.
Reheating
Reheat gently over medium heat on the stove or in the microwave, adding a splash of water or broth if the sauce appears thickened or sticky to refresh its texture.
FAQs
What is Moo Goo Gai Pan?
Moo Goo Gai Pan is a classic Chinese stir-fry dish made with chicken, mushrooms, and mixed vegetables cooked in a savory sauce.
Can I make Moo Goo Gai Pan vegetarian?
Yes, you can substitute chicken with firm tofu or extra vegetables to create a delicious vegetarian version.
Is Moo Goo Gai Pan healthy?
Absolutely! It’s packed with lean protein and fresh vegetables, making it a nutritious choice that is light yet satisfying.
What vegetables go best in Moo Goo Gai Pan?
Traditional options include mushrooms, snow peas, water chestnuts, and bamboo shoots, but bell peppers or broccoli also work well.
How should I store leftover Moo Goo Gai Pan?
Keep it in an airtight container in the refrigerator for up to 3 days or freeze if you want to save it longer.
Final Thoughts
This easy Moo Goo Gai Pan recipe is a true lifesaver for busy nights when you want a quick, wholesome, and flavorful dinner. It’s simple to make, endlessly adaptable, and always hits the spot. Give it a try, and enjoy a deliciously satisfying meal that feels like a warm hug on a plate.
Related Posts
- Easy Homemade Stromboli with Cheesy Meat Filling
- Easy Chicken Alfredo Air Fryer Calzones Recipe
- How to Make Garbage Bread with Cheesy Bacon & Beef Filling
Moo Goo Gai Pan
A quick, wholesome, and flavorful Chinese stir-fry featuring tender chicken breast, crisp vegetables, and a savory sauce. Perfect for busy weeknights, this easy Moo Goo Gai Pan recipe delivers vibrant flavors with simple, fresh ingredients in under 30 minutes.
- Prep Time: 10 minutes
- Cook Time: 15 minutes
- Total Time: 25 minutes
- Yield: 4 servings 1x
- Category: Main Course
- Method: Stir-frying
- Cuisine: Chinese
- Diet: Gluten Free (with tamari substitution)
Ingredients
Protein
- 1 lb boneless chicken breast, thinly sliced
Vegetables
- 8 oz fresh button mushrooms, sliced
- 1 cup snow peas or snap peas, trimmed
- 1/2 cup sliced water chestnuts
- 2 cloves garlic, minced
- 1 teaspoon fresh ginger, minced
Sauce
- 3/4 cup chicken broth
- 2 tablespoons soy sauce
- 1 tablespoon oyster sauce
- 1 tablespoon cornstarch slurry (1 tablespoon cornstarch mixed with 2 tablespoons water)
Finishing
- 1 teaspoon sesame oil
- 2 tablespoons vegetable oil (for stir-frying)
Instructions
- Prepare the Ingredients: Slice the chicken breast into thin, bite-sized pieces. Clean and slice mushrooms, trim the snow peas, rinse the water chestnuts. Mince garlic and ginger to release their flavors.
- Make the Sauce: In a small bowl, whisk together chicken broth, soy sauce, oyster sauce, and the cornstarch slurry until smooth.
- Cook the Chicken: Heat a wok or large skillet over medium-high heat with vegetable oil. Add the chicken pieces and stir-fry until they turn opaque and start to brown. Remove chicken from the pan to avoid overcooking.
- Stir-Fry the Vegetables: Add garlic, ginger, mushrooms, snow peas, and water chestnuts to the pan. Stir-fry until vegetables are tender-crisp, retaining their color and crunch.
- Combine and Simmer: Return the chicken to the pan and pour in the prepared sauce. Stir well and let simmer for 2-3 minutes until the sauce thickens and coats all the ingredients.
- Finish with Sesame Oil: Turn off heat and drizzle sesame oil over the dish. Toss gently to evenly distribute the fragrant oil before serving.
Notes
- Prep all ingredients before cooking to ensure quick, even stir-frying.
- Use high heat to keep vegetables crisp and chicken tender.
- Avoid overcrowding the pan; cook in batches if necessary to prevent steaming.
- Cut chicken into uniform small pieces for consistent cooking.
- Add sauce gradually—pour half first and add more as needed to achieve desired thickness.
Nutrition
- Serving Size: 1 cup
- Calories: 220 kcal
- Sugar: 3 g
- Sodium: 600 mg
- Fat: 7 g
- Saturated Fat: 1 g
- Unsaturated Fat: 5 g
- Trans Fat: 0 g
- Carbohydrates: 12 g
- Fiber: 3 g
- Protein: 28 g
- Cholesterol: 65 mg
Keywords: Moo Goo Gai Pan, Chinese chicken stir-fry, quick dinner, healthy chicken recipe, Chinese vegetables stir-fry