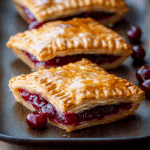
Easy and Irresistible Simple Cherry Pastry Pies

Simple Cherry Pastry Pies are a delightful treat that brings together sweet cherries and flaky pastry in a way that’s both comforting and exciting. This recipe is perfect for beginners and seasoned bakers alike, proving that creating a delicious, irresistible dessert doesn’t have to be complicated. Whether you’re preparing for a family gathering or simply craving a sweet snack, Simple Cherry Pastry Pies will quickly become a staple in your baking repertoire.
Why You’ll Love This Recipe
- Effortless baking: Minimal ingredients and easy steps make it perfect for busy bakers or beginners.
- Perfectly balanced flavors: The sweet-tart cherry filling complements the buttery, flaky pastry flawlessly.
- Versatile for any occasion: These pies look elegant on dessert tables or work as quick grab-and-go snacks.
- Customizable: Suitable for adapting with dietary preferences or favorite flavors.
Ingredients You’ll Need
Creating Simple Cherry Pastry Pies requires only a handful of essential ingredients, each contributing to the perfect taste, texture, and appearance. From flaky pastry to juicy cherries, each component plays a vital role in crafting this irresistible dessert.
- Frozen puff pastry: Provides the flaky, golden crust that holds the filling beautifully.
- Fresh or frozen cherries: The star fruit delivers natural sweetness and vibrant color.
- Sugar: Balances the tartness of the cherries to create a luscious filling.
- Cornstarch: Acts as a thickener to keep the cherry filling from running.
- Lemon juice: Adds brightness and enhances the cherry flavor.
- Vanilla extract: Introduces a subtle warmth that rounds out the filling’s taste.
- Egg wash: Ensures a shiny, golden crust for the perfect finish.
Variations for Simple Cherry Pastry Pies
One of the joys of Simple Cherry Pastry Pies is how easily you can tweak the recipe to suit your taste buds or dietary needs. Whether you want to switch up the fruit or adjust flavors, customizing these pies is simple and fun.
- Mixed berry version: Swap cherries with a blend of strawberries, blueberries, and raspberries for a vibrant twist.
- Gluten-free alternative: Use gluten-free puff pastry for those with dietary restrictions without sacrificing flaky goodness.
- Spiced cherries: Add cinnamon or nutmeg to the filling for a cozy, warm flavor profile.
- Almond topping: Sprinkle sliced almonds on top before baking for added crunch and nuttiness.
- Vegan option: Replace the egg wash with a plant-based milk and maple syrup mix to keep it egg-free.

How to Make Simple Cherry Pastry Pies
Step 1: Prepare the Cherry Filling
Start by combining fresh or thawed frozen cherries with sugar, cornstarch, lemon juice, and vanilla extract in a saucepan. Cook over medium heat until the mixture thickens and becomes glossy, then set it aside to cool.
Step 2: Roll Out the Puff Pastry
Thaw your puff pastry according to the package instructions, then gently roll it out on a lightly floured surface to smooth the folds and stretch it slightly for easier handling.
Step 3: Cut and Fill the Pastry
Cut the pastry into evenly sized squares or circles. Spoon a generous amount of the cooled cherry filling onto half of them, leaving space at the edges for sealing.
Step 4: Seal the Pies
Place the remaining pastry pieces on top of the filling. Press the edges firmly with a fork to seal in the filling and prevent leaks during baking.
Step 5: Apply Egg Wash and Vent
Brush the top of each pie with an egg wash to achieve a golden finish. Use a sharp knife to create a small slit or decorative vent on top to allow steam to escape.
Step 6: Bake
Bake the pies in a preheated oven at 375°F (190°C) for 20-25 minutes or until the pastry is puffed and golden brown.
Pro Tips for Making Simple Cherry Pastry Pies
- Chill the pastry: Keep puff pastry cold before baking to ensure maximum flakiness and prevent shrinking.
- Don’t overfill: Too much filling can cause leaks; use a moderate amount to keep pies intact.
- Even vents: Create uniform slits for better presentation and proper steam release.
- Use fresh lemon juice: It enhances flavor far better than bottled in this recipe.
- Let pies cool: Allow cooling for 10 minutes before serving to set the filling and avoid burns.
How to Serve Simple Cherry Pastry Pies
Garnishes
Simple Cherry Pastry Pies shine when topped with a light dusting of powdered sugar or a drizzle of vanilla glaze. Fresh mint leaves or a sprinkle of toasted almonds add a lovely finishing touch.
Side Dishes
Pair these pies with a scoop of vanilla ice cream or some whipped cream to elevate the experience. A side of fresh fruit or a simple green salad can also provide a balanced contrast to the sweetness.
Creative Ways to Present
Serve the pies warm on a rustic wooden board for a charming farmhouse vibe, or arrange them on elegant plates with edible flowers for a classy touch. Mini versions make perfect finger foods for parties or afternoon tea.
Make Ahead and Storage
Storing Leftovers
After cooling, store any leftover pies in an airtight container at room temperature for up to 2 days, or refrigerate for up to 4 days to maintain freshness.
Freezing
You can freeze unbaked pies on a baking sheet before wrapping them tightly in plastic wrap and foil. Bake straight from frozen by adding a few extra minutes to the baking time.
Reheating
Reheat chilled or frozen pies in a preheated oven at 350°F (175°C) for 10-15 minutes until warmed through and the crust is crisp again. Avoid microwaving to preserve flakiness.
FAQs
Can I use canned cherries instead of fresh or frozen?
While canned cherries can be used in a pinch, fresh or frozen cherries offer better texture and flavor for Simple Cherry Pastry Pies, so they’re the preferred choice.
How do I prevent the pastry from getting soggy?
Ensuring the filling isn’t too wet and using cornstarch to thicken it helps keep the pastry crisp. Also, venting the pies properly allows steam to escape during baking.
Can I make these pies vegan?
Absolutely! Use a vegan puff pastry and replace the egg wash with a mixture of plant-based milk and maple syrup or melted coconut oil for a glossy finish.
What’s the best way to thaw frozen cherries?
Place frozen cherries in a sieve over a bowl to drain excess liquid as they thaw or gently heat them in a saucepan to speed up the process without losing texture.
How long do Simple Cherry Pastry Pies last?
Stored properly, these pies last about 2 days at room temperature and up to 4 days refrigerated. Freezing extends their shelf life up to 3 months.
Final Thoughts
There’s something truly special about Simple Cherry Pastry Pies that makes baking feel both joyful and rewarding. With their irresistible sweetness, beautiful flaky crust, and endless adaptability, these pies are perfect to share with loved ones or enjoy as a cozy solo treat. Give this recipe a try today—your kitchen will thank you!
Related Posts
- Irresistible Apple Coffee Cake with Cinnamon Streusel
- 5 Reasons Apple Crisp with Oats and Cinnamon Wins
- How to Make Sour Cream Apple Pie with Brown Sugar Streusel
Simple Cherry Pastry Pies
Simple Cherry Pastry Pies combine sweet and tart cherries with a flaky, buttery puff pastry crust to create an effortless and delicious dessert. Perfect for all skill levels, these pies offer balanced flavors and versatility, making them an ideal treat for gatherings, snacks, or special occasions.
- Prep Time: 15 minutes
- Cook Time: 25 minutes
- Total Time: 40 minutes
- Yield: 8 pies 1x
- Category: Dessert
- Method: Baking
- Cuisine: American
- Diet: Can be gluten-free with substitutions; vegan options available
Ingredients
Pastry
- Frozen puff pastry (thawed as per package instructions)
Cherry Filling
- 2 cups fresh or frozen cherries (thawed if frozen)
- 3/4 cup sugar
- 2 tablespoons cornstarch
- 1 tablespoon fresh lemon juice
- 1 teaspoon vanilla extract
For Finishing
- 1 egg (for egg wash)
Instructions
- Prepare the Cherry Filling: Combine the fresh or thawed frozen cherries with sugar, cornstarch, lemon juice, and vanilla extract in a saucepan. Cook over medium heat, stirring frequently, until the mixture thickens and becomes glossy. Remove from heat and set aside to cool completely.
- Roll Out the Puff Pastry: Thaw the puff pastry sheets according to the package instructions. On a lightly floured surface, gently roll out the pastry to smooth the folds and stretch it slightly for easier handling.
- Cut and Fill the Pastry: Cut the pastry into evenly sized squares or circles. Spoon a generous amount of the cooled cherry filling onto half of the pastry pieces, leaving space at the edges to seal.
- Seal the Pies: Place the remaining pastry pieces on top of the filling. Press the edges firmly with a fork to seal the pies and prevent filling leaks during baking.
- Apply Egg Wash and Vent: Brush the tops of the pies with beaten egg to achieve a shiny, golden finish. Use a sharp knife to cut small slits or decorative vents on top to allow steam to escape while baking.
- Bake: Preheat the oven to 375°F (190°C). Bake the pies for 20-25 minutes or until the pastry is puffed and golden brown.
Notes
- Chill the pastry: Keep puff pastry cold before baking to ensure maximum flakiness and prevent shrinking.
- Don’t overfill: Use a moderate amount of filling to avoid leaks.
- Even vents: Create uniform slits for better presentation and steam release.
- Use fresh lemon juice: Enhances flavor better than bottled juice.
- Let pies cool: Allow them to cool for 10 minutes before serving to set filling and avoid burns.
Nutrition
- Serving Size: 1 pie
- Calories: 300
- Sugar: 18g
- Sodium: 150mg
- Fat: 15g
- Saturated Fat: 5g
- Unsaturated Fat: 8g
- Trans Fat: 0g
- Carbohydrates: 38g
- Fiber: 2g
- Protein: 3g
- Cholesterol: 40mg
Keywords: cherry pies, puff pastry, cherry dessert, easy baking, sweet pastry, fruit pies, vegan pie option, gluten-free pie option